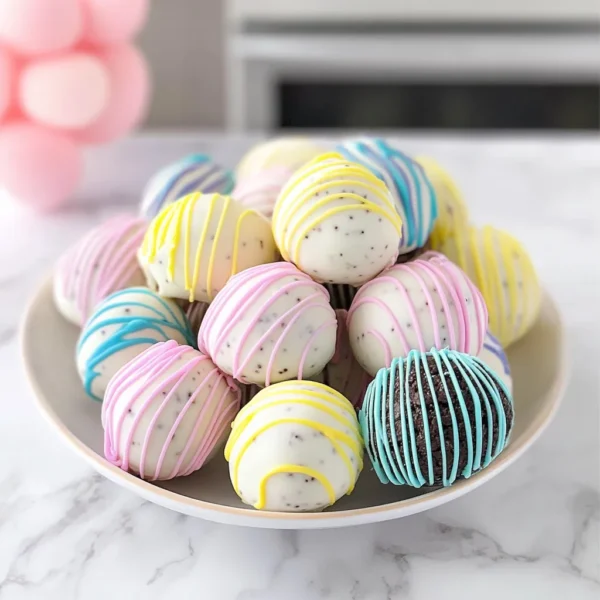
Easter Egg Oreo Cookie Balls
Spring has always held a special place in my heart, filled with blooming flowers, sunny afternoons, and that sweet, sweet rush of Easter festivities! As I watch kids giggling during egg hunts, it takes me back to my own childhood, when we’d dive into baskets filled with colorful eggs and chocolates. One treat that stands out from those days is the classic Oreo cookie—those crunchy chocolate biscuits with a creamy filling that can make anyone’s day just a little bit brighter.
Combine that nostalgia with the vibes of Easter, and you get something irresistible: Easter Egg Oreo Cookie Balls. Oh my goodness, these little bites are not only ridiculously easy to make, but they are also a showstopper at any gathering. Whether you’re celebrating with family, friends, or just enjoying a quiet night in, these beauties will put a smile on anyone’s face. So, roll up your sleeves, and let’s dive into this delightfully sweet adventure together!
Why You’ll Love This Recipe
- Fast and easy preparation—ready in under an hour!
- Perfect for parties, brunches, or as a fun family activity.
- Customization options for specific dietary needs.
- Kid-friendly—a hit among both children and adults!
- No baking required! Just mix, shape, and chill.
Ingredients
Gathering these simple ingredients will make the magic happen:
- 1 package (15.25 oz) Oreo cookies, crushed (or about 36 cookies)
- 8 oz cream cheese, softened (full-fat for creaminess!)
- 12 oz white chocolate or candy melting wafers
- 1 cup Easter-themed sprinkles or crushed colored candy eggs
- 1 teaspoon vanilla extract (optional for added depth)
Note: Make sure your cream cheese is at room temperature for easy mixing. And the more colorful the sprinkles, the merrier these cookie balls will look!

Step-by-Step Instructions
- In a large mixing bowl, combine the crushed Oreo cookies and softened cream cheese. Use a spatula or your hands (yes, it’s that fun!) to mix until fully combined. It should resemble a sticky, crumbly dough.
- Once mixed, cover your hands with a little bit of powdered sugar (trust me, it helps!) and roll the mixture into 1-inch balls. Place the balls on a baking sheet lined with parchment paper.
- Now, pop the baking sheet in the fridge for at least 30 minutes to let those cookie balls firm up. This step is crucial—if they’re too soft, you’ll have a mess on your hands when you dip them in chocolate!
- While the cookie balls are chilling, melt the white chocolate or candy melts in a microwave-safe bowl. Heat in 30-second intervals, stirring well each time, until smooth.
- Once the cookie balls are firm, get them out of the fridge. Dip each ball into the melted chocolate using a fork, letting the excess drip off before placing them back on the parchment-lined baking sheet.
- To make them extra festive, sprinkle those fun Easter-themed sprinkles or crushed candy eggs on top while the chocolate is still wet. They really add that pop of color and crunch!
- Once all the cookie balls are coated and decorated, place them in the fridge again to let the chocolate set. Give them about 20 minutes, and they’ll be good to go!
Watch out for the temptation to eat too many while they are cooling. It’s hard to resist stealing a bite or two…trust me!
Pro Tips & Variations
Feeling adventurous? Here are some delightful twists you can take with your Easter Egg Oreo Cookie Balls:
- Dive deep into flavor: Try mixing in a tablespoon of peanut butter for a rich, nutty flavor!
- Chocolate lovers’ paradise: Swap the white chocolate for milk or dark chocolate for a different taste profile.
- Diet-friendly: Use gluten-free Oreos and vegan cream cheese for a tasty vegan version!
- Flavor infusions: A pinch of almond or peppermint extract can transform your cookie balls into a whole new seasonal treat!
Serving Suggestions
These festive little delights can stand alone as a sweet treat or can be served alongside an array of other goodies. Imagine setting up a beautiful spread featuring fresh fruit, cupcakes, and a pot of hot coffee or tea—you’ve got a sophisticated and cheerful table for your guests. They also make for perfect gifts wrapped in clear bags with a pretty ribbon, just in time for Easter gatherings.
If you’re hosting a brunch, why not pair them with some fluffy pancakes, pastel-colored mimosas, or even a cucumber sandwich for that added touch of fancy? The vibrant look of the cookie balls adds a fantastic pop of color to any appetizer plate or dessert table.
Storage Tips
Want to make these ahead of time? You can easily whip them up a few days in advance! Just store them in an airtight container in the refrigerator for up to a week. If you want to make them even earlier, you can freeze them! Just pop the undipped cookie balls in a freezer-safe container or bag; they’ll be good for up to three months.
When you’re ready to enjoy them, let them thaw in the fridge for a few hours before dipping in melted chocolate. Trust me; you won’t lose any of that creamy, dreamy flavor!
FAQs
Can I use other types of cookies instead of Oreos?
Absolutely! Any cream-filled cookies would work well. Think of using Golden Oreos, or even flavor variations like chocolate mint cookies for an exciting twist!
Can I make these cookie balls gluten-free?
Yes! Just use gluten-free Oreos, and be sure your other ingredients (like cream cheese and chocolate) are gluten-free as well. Everyone can enjoy these delightful treats!
What if I don’t like white chocolate—can I substitute it?
Definitely! Milk chocolate or dark chocolate are both fantastic alternatives. You can even mix together different chocolates for a swirled effect!
How do I know when the chocolate is melted enough to dip?
The chocolate should be smooth and pourable, but not overly hot. If it’s bubbling, take it out and stir! We want it at a nice, even temperature for dipping those cookie balls without them falling apart.
Don’t forget to let those extra cookie balls freeze for playful treats later! I can’t wait to hear how yours turn out!
Conclusion
There you have it—Easter Egg Oreo Cookie Balls that are sure to steal the show! This recipe is not only a delightful ode to the flavors of Easter, but it also brings back warm memories and festive cheer. I’d love to hear how your experience turns out—please feel free to share in the comments below or tag me in your photos if you recreate this deliciousness! Happy baking, and may your spring be filled with sweetness and joy!

Leave a Comment