Oh my goodness, friends! Isn’t it just the best time of year to gather around the table with family and friends? As the leaves start to turn golden and the air gets a little crisper, I always get that warm and fuzzy feeling for the festive season. It reminds me of childhood excitement—when the Thanksgiving holidays rolled around, and we’d spend hours in the kitchen baking and decorating. One of my favorite things to whip up was something that combined fun and creativity. That’s when I discovered the magic of “The Cutest Nutter Butter Turkey Cupcakes”!
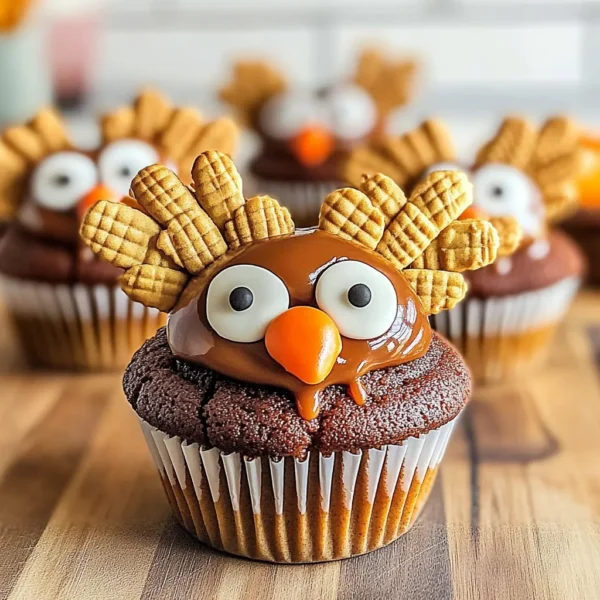
These delightful cupcakes aren’t just a feast for the taste buds; they’re a visual treat, too! They’re super easy to make, and trust me, everyone will go “Awww!” when they see them. The combination of rich chocolate cake, creamy frosting, and those adorable Nutter Butter cookies painted to look like little turkeys is simply irresistible. Whether you’re making them for Thanksgiving, an autumn gathering, or just a fun baking day with the kids, these cupcakes are sure to bring a smile to everyone’s face.
Why You’ll Love This Recipe
- Easy to follow, perfect for bakers of all levels.
- A fun activity for kids—everybody can join in on the decorating!
- Chocoholic approved: decadent chocolate cupcakes are hard to resist.
- Ultimate crowd-pleaser—the visual appeal will wow your guests.
- Simple ingredients that are easy to find.
Ingredients
Grab your aprons, and let’s dive into the ingredient list. Most of these you may already have in your kitchen!
- For the cupcakes:
- 1 ¾ cups all-purpose flour
- 1 ½ cups granulated sugar
- ¾ cup unsweetened cocoa powder (the good stuff, for that rich chocolate flavor!)
- 2 teaspoons baking powder
- 1 ½ teaspoons baking soda
- 1 teaspoon salt
- 2 large eggs
- 1 cup whole milk
- ½ cup vegetable oil
- 2 teaspoons vanilla extract
- 1 cup boiling water
- For the frosting:
- 1 cup unsalted butter, softened to room temperature
- 4 cups powdered sugar
- ½ cup cocoa powder
- ¼ cup heavy cream (or milk)
- 1 tablespoon vanilla extract
- For decorating:
- 12 Nutter Butter cookies
- Mini candy corn (for the beaks)
- Chocolate chips (for the eyes)
- Colored sprinkles (to add extra fun!)
Helpful tip: When making the frosting, ensure your butter is just right—not melted, but soft enough to cream smoothly with the sugar.
Step-by-Step Instructions
Ready to make some cupcake magic? Let’s get started!
- Preheat the oven: Preheat your oven to 350°F (175°C) and line a muffin pan with cupcake liners.
- Mix the dry ingredients: In a large mixing bowl, whisk together the flour, sugar, cocoa powder, baking powder, baking soda, and salt until well combined.
- Combine wet ingredients: In another bowl, add the eggs, milk, oil, and vanilla extract. Whisk until fully combined.
- Combine wet and dry: Gradually add the wet ingredients to the dry ingredients, gently mixing until just combined. Don’t be tempted to overmix; this will keep your cupcakes soft and fluffy!
- Add boiling water: Slowly stir in the boiling water. This step will thin the batter and make it extra moist, so don’t skip it!
- Fill the cupcake liners: Pour the batter into the prepared cupcake liners, filling each about two-thirds of the way full. This gives them room to rise without overflowing.
- Bake: Pop your cupcakes in the oven and bake for about 20-24 minutes, or until a toothpick inserted in the center comes out clean. The kitchen will smell heavenly!
- Cool: Allow the cupcakes to cool in the pan for about 5 minutes, then transfer them to a wire rack to cool completely.
- Make the frosting: While the cupcakes cool, whip up your chocolate frosting. In a large bowl, beat the softened butter until creamy. Gradually add the powdered sugar and cocoa powder, alternating with the heavy cream and vanilla. Beat until fluffy and smooth. If it seems too thick, add a splash more cream!
- Frost those cupcakes: Once your cupcakes are completely cool, top them generously with your luscious chocolate frosting using a piping bag or a knife. Make them as swirly and fun as you like!
- Decorate: Now for the fun part! Dip the end of each Nutter Butter cookie in frosting, then press the cookie onto the frosted cupcake to create your turkey’s body. Use candy corn for beaks, and chocolate chips for eyes. Add colored sprinkles for that extra festive touch. Get creative!
Pro tip: If your frosting is softening too quickly, pop it into the fridge for a bit to firm it up before you start decorating.

Pro Tips & Variations
Want to put a twist on your turkey cupcakes? Here’s how you can shake things up:
- Spice it up: Consider adding a pinch of cinnamon or nutmeg to your cupcake batter for a warm, fall flavor.
- Swap the frosting: Use vanilla buttercream or cream cheese frosting for a different flavor profile.
- Make them gluten-free: Substitute the all-purpose flour with a gluten-free blend. Just ensure your baking powder is gluten-free too!
- Decorate with candy: Instead of Nutter Butter cookies for the body, you could use mini cupcakes, marshmallows, or even cake pops!
Serving Suggestions
These adorable cupcakes are perfect for any celebration! Serve them on a festive platter with autumn leaves and a cozy bowl of cider. You could even take them to a potluck; just make sure to bring enough because they tend to disappear quickly! They pair nicely with hot cocoa, coffee, or even a scoop of vanilla ice cream on the side, if you’re feeling extra indulgent.

Storage Tips
Want to save some for later? No problem! Here’s how to keep your delightful creations fresh:
- Room temperature: If you plan to eat the cupcakes within a few days, store them in an airtight container at room temperature. They’ll last about 3-4 days.
- Refrigeration: For longer storage, place them in the fridge. Just be sure to bring them back to room temperature before serving, as they taste best that way.
- Freezing: If you want to prepare ahead, freeze the unfrosted cupcakes in an airtight container for up to 3 months. When ready to enjoy, let them thaw and frost them fresh!
FAQs
Can I use a different flavor of cake mix?
Absolutely! You can experiment with vanilla or even red velvet cake mix instead of chocolate. Just adjust the frosting if needed to complement the flavors!
Why do I need to add boiling water to the batter?
The boiling water helps to bloom the cocoa powder, enhancing the chocolate flavor and keeping your cupcakes moist and tender. Trust me, it makes a difference!
Can I make these ahead of time?
Of course! You can bake the cupcakes a day or two in advance. Just store them in an airtight container and frost them closer to the serving time for best results.
What if I don’t have Nutter Butter cookies?
No worries! You can use any cookie that has a nice shape or size, like Oreos or even Brownie Bites. Just get creative!
How can I make these cupcakes allergy-friendly?
You can adapt the recipe to be gluten-free by swapping for a gluten-free flour blend. Look for nut-free and dairy-free substitutes for the frosting as well—coconut cream can be a great alternative.

Conclusion
I hope you feel inspired to dive into the kitchen and whip up a batch of these Cutest Nutter Butter Turkey Cupcakes! They’re not just treats; they’re little bundles of joy that bring everyone together. I’d love to hear how your baking adventure went! Drop a comment below with your thoughts, or share a photo of your own creations. Happy baking, and may your holiday season be filled with love, laughter, and a sprinkle of sweetness!

Leave a Comment