
Ah, the beloved Snowball Cake! Just the name evokes a flurry of memories for me. Growing up, this delightful dessert was always present during winter festivities, family gatherings, and the occasional Sunday dinner. There’s something incredibly heartwarming about that fluffy white frosting, like a cozy blanket against the cold. When I smell the sweet scent of vanilla wafting through the kitchen, I can’t help but feel nostalgic. It’s as if the world outside disappears, and all that exists is the joy of baking and sharing this masterpiece with friends and family.
If you’re looking for a cake that’s not just delicious but also brimming with love, look no further. This Snowball Cake Recipe is not just a treat; it’s an experience filled with warmth, laughter, and a sprinkle of sweetness. Perfect for any occasion, or simply when you need a little something to brighten your day, this cake is sure to win hearts. So, let’s roll up our sleeves, pour some love into our mixing bowls, and create something magical!
Why You’ll Love This Recipe
- Simple ingredients that you probably already have on hand.
- A stunning presentation that will impress your family and friends.
- Comforting flavors that remind you of home.
- Perfect for celebrations or just because you deserve a treat!
- Freezable, so you can enjoy it later if you have leftovers (which you might not!).
Ingredients
Here’s what you’ll need to whip up this enchanting Snowball Cake:
- 1 cup unsalted butter, softened (room temperature is key!)
- 2 cups granulated sugar
- 4 large eggs (fresh eggs create a fluffier texture)
- 1 teaspoon vanilla extract (the real stuff, please!)
- 3 cups all-purpose flour
- 1 tablespoon baking powder
- ½ teaspoon salt
- 1 cup milk (whole milk works best, it makes the cake richer)
- 1 cup shredded coconut (unsweetened for a more authentic taste)
- For the frosting:
- 1 cup heavy whipping cream
- ½ cup powdered sugar
- 1 teaspoon vanilla extract
- Additional shredded coconut for topping
Step-by-Step Instructions
Ready to create some magic? Let’s get started!
- Preheat the oven: Start by preheating your oven to 350°F (175°C). Grease and flour three 9-inch round cake pans. This will ensure your cake slides out smoothly once it’s baked.
- Beat the butter and sugar: In a large mixing bowl, cream together the softened butter and granulated sugar using an electric mixer until light and fluffy. This usually takes about 3 to 5 minutes. The mixture should look pale and velvety.
- Add the eggs: One at a time, add in the eggs. Make sure to beat well after each addition until fully incorporated. This step is crucial for achieving that light, airy texture.
- Mix in vanilla: Add the vanilla extract and mix until well combined. The aroma will be absolutely heavenly!
- Combine dry ingredients: In a separate bowl, whisk together the flour, baking powder, and salt. Gradually add this dry mixture to the wet mixture, alternating with the milk. Start and end with the dry ingredients. Be gentle while folding the mixture – overmixing can lead to a dense cake, and nobody wants that!
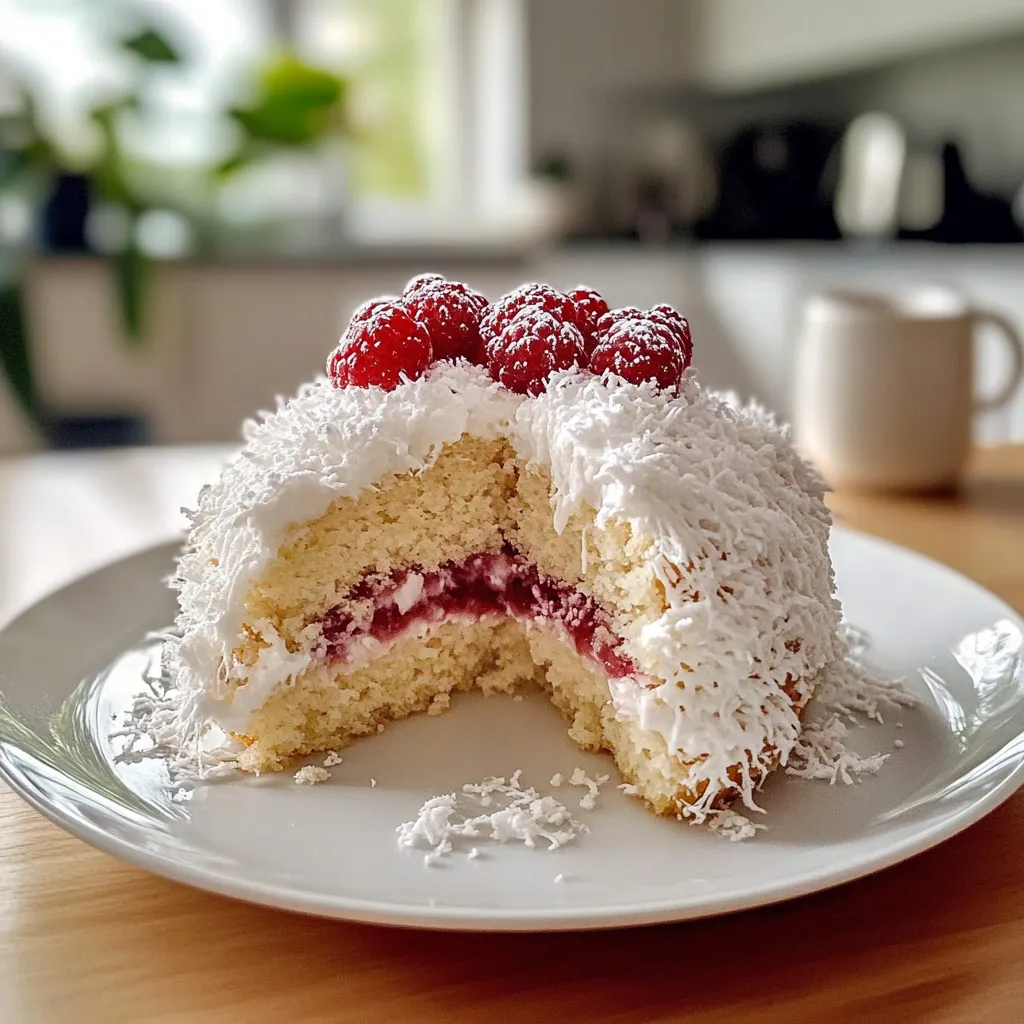
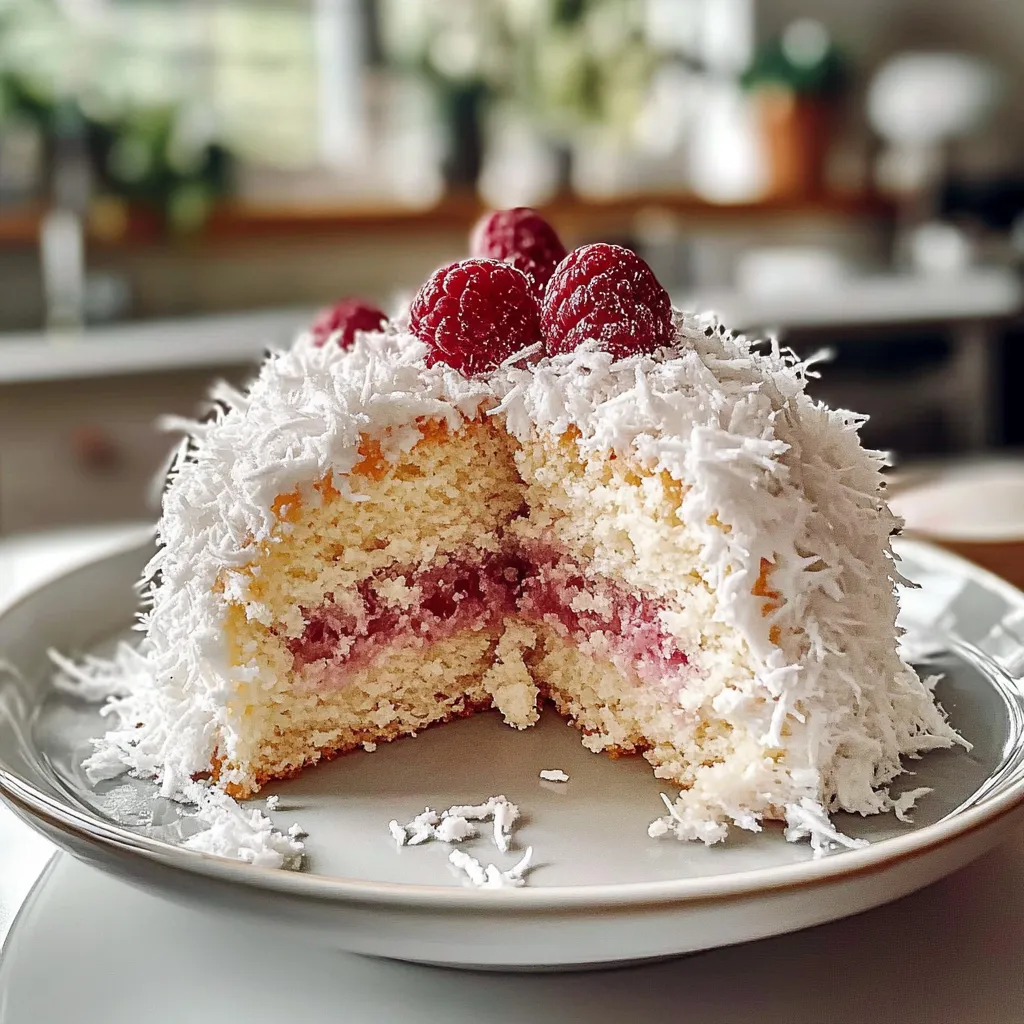
- Fold in coconut: Finally, fold in that lovely shredded coconut to give the cake a delightful texture. This is where your cake truly starts to come to life!
- Bake the cake: Divide the batter evenly among the prepared pans. Bake in the preheated oven for 25 to 30 minutes, or until a toothpick inserted into the center comes out clean. Keep an eye on it as baking times can vary. You want it just golden and not overbaked!
- Cool the cakes: Let the cakes cool in the pans for about 10 minutes, then turn them out onto wire racks to cool completely. Don’t rush this step; icing a warm cake isn’t a good idea.
- Make the frosting: In a chilled mixing bowl, whip the heavy cream until it starts to thicken. Gradually add the powdered sugar and vanilla, and continue to whip until stiff peaks form. This fluffy frosting will be the cherry on top!
- Assemble the cake: Place one cake layer on a serving plate. Spread a generous layer of frosting on top, then place the second layer on top and repeat. Finally, add the third layer and frost the top and sides of the cake. Don’t stress about perfection; it’s all about the love you put into it!
- Cover with coconut: Gently press the remaining shredded coconut onto the frosted cake, covering it evenly. This step adds the signature snowball look and a delicious coconut crunch.
- Chill and serve: For best flavor, chill the cake in the refrigerator for at least 30 minutes before serving. This allows the flavors to meld beautifully.
Pro Tips & Variations
Here are a few artist’s touches you can add to customize your Snowball Cake:
- Flavor Boost: Experiment with different extracts! Almond extract adds a warm, nutty flavor that pairs beautifully with vanilla.
- Berry Bliss: Add layers of fresh raspberries or strawberries between the cake layers. The tart freshness complements the sweetness perfectly!
- Nutty Addition: If you love nuts, feel free to sprinkle chopped pecans or walnuts between the layers for a delightful crunch.
- Chocolate Lover’s Delight: Incorporate cocoa powder into the batter for a chocolate version, and pair it with chocolate frosting!
Serving Suggestions
Now that your Snowball Cake is ready, how will you serve it? I recommend pairing it with a hot cup of coffee or tea for a delightful afternoon treat. Imagine cutting into that fluffy, snowy-white cake and watching your friends’ eyes light up as they take their first bites! For a special twist, serve each slice with a dollop of whipped cream and a sprinkle of extra chocolate or coconut flakes on top. You might also want to bring out some fresh berries to add a touch of color and acidity to balance the sweetness.
This cake is perfect for any gathering—birthdays, holidays, or even a cozy weekend brunch. Trust me; it becomes the star of the show every time.
Storage Tips
Now, if by some miracle you have leftovers (not likely, but just in case!), here’s how to keep your Snowball Cake fresh:
- Refrigerating: Store leftovers in an airtight container in the fridge for up to 4 to 5 days. Just make sure to be gentle when cutting to avoid squishing that fluffy frosting!
- Freezing: You can also freeze this cake! Wrap individual slices tightly in plastic wrap and then in foil. They’ll keep well for up to 3 months. Thaw in the refrigerator overnight when you’re ready to enjoy a slice.
- Reheating: If you’ve frozen slices, you can let them thaw naturally or pop them in the microwave for a few seconds. Just be cautious not to overheat!
FAQs
Can I make this cake ahead of time?
Absolutely! This cake holds up wonderfully, and the flavors deepen after a day in the fridge. You can bake it a day or two in advance, frosting it just before serving for optimum freshness.
Can I use a different type of frosting?
Absolutely! A cream cheese frosting or a whipped ganache could be delightful alternatives. Each would give the cake a different but equally tasty vibe.
Is this cake suitable for dietary restrictions?
This cake can be adjusted for dietary needs! You can use almond milk or coconut milk for a dairy-free version, and there are many gluten-free flour options available that can replace all-purpose flour with great results.
What if I don’t like coconut?
No problem! You can simply leave out the coconut in the batter and on top. The cake will still be delicious and fluffy. Consider using crushed graham crackers or crushed nuts instead for texture and flavor!
How can I make this a layer cake?
The Snowball Cake is already a layered cake! If you want to make it taller, you can bake it in two 8-inch round pans instead of three 9-inch rounds, and stack them high with plenty of frosting and maybe some fillings in between!
Conclusion
And there you have it, my friend! A Snowball Cake that’s not just a dessert but a memory-maker. I hope you’re inspired to experience the joy of baking and sharing this fluffy, coconut-topped delight with those you love. Whether it becomes a cherished tradition in your home or a unique treat for a special occasion, it’s sure to bring smiles and happiness. Don’t forget to come back and share your thoughts or variations in the comments! Happy baking!


Leave a Comment