It’s that time of year again when the leaves turn crisp, the air carries a hint of pumpkin spice, and fun-sized candy bars are practically a food group! Halloween has always held a special place in my heart. As a kid, I can still remember the excitement of picking out my costume, the fun of trick-or-treating, and the sugar rush that came with piling my bounty into a colorful pillowcase at the end of the night. Of course, no holiday celebration would be complete without a delicious dessert to bring the family together. That’s where my Halloween No-Bake Cherry Cheesecake comes in! It captures the spirit of the season in a wonderfully creamy way while being super easy to whip up—no oven required!
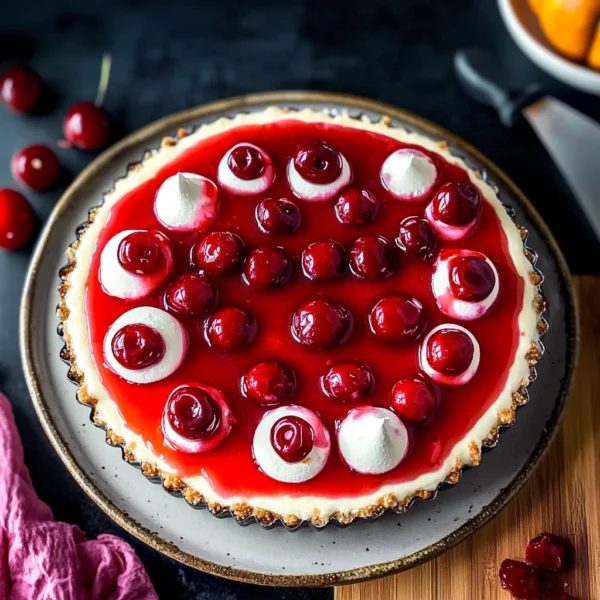
This dish has become a staple in our home during the haunting season, and I can’t wait to share it with you. It’s rich, delicious, and topped with vibrant, juicy cherries that resemble spooky little blood-red jewels resting on a ghostly white cheesecake. Every bite is a delight to the senses, making it the perfect festive treat to wow your family and friends. So, let’s roll up our sleeves and get started, shall we?
Why You’ll Love This Recipe
- No baking required: Perfect for hot autumn days or when you’re short on time.
- Kid-friendly: A fun recipe to make with children; they’ll love helping stir and decorate!
- Decadent flavor: Creamy cheesecake and sweet cherry topping = pure bliss.
- Flexible recipe: Easy to adapt with different fruit toppings or flavored extracts.
Ingredients
Here’s what you need to create this dreamy Halloween No-Bake Cherry Cheesecake:
- For the crust:
- 1 ½ cups graham cracker crumbs
- ½ cup unsalted butter, melted
- ¼ cup granulated sugar
- For the filling:
- 16 oz cream cheese, softened (bring it to room temperature for a smoother texture)
- 1 cup powdered sugar
- 1 teaspoon vanilla extract
- 2 cups whipped topping (like Cool Whip—thawed)
- For the topping:
- 1 can (21 oz) cherry pie filling
- Optional: Candy eyeballs or Halloween-themed sprinkles for decoration!
Note: Feel free to substitute the graham cracker crumbs with crushed oreos for a chocolatey twist, or use gluten-free cookies if you’re catering to dietary needs. The beauty of this cheesecake is in its flexibility!

Step-by-Step Instructions
Let’s get our hands messy and dive into this deliciously sweet adventure:
- Make the crust: In a mixing bowl, combine the graham cracker crumbs, melted butter, and granulated sugar. Stir until everything is moistened and you can easily squeeze it into a clump. This will be the base of your cheesecake!
- Press the crust into the pan: Grab a 9-inch springform pan (you can also use a pie dish if that’s what you have). Press the crumb mixture firmly into the bottom and slightly up the sides of the pan using your fingers or the bottom of a measuring cup. This helps create a sturdy crust that will hold up beautifully!
- Chill the crust: Place the crust in the refrigerator while you prepare the filling to help it firm up.
- Make the cheesecake filling: In a large bowl, beat the softened cream cheese until smooth using an electric mixer. Gradually add in the powdered sugar and vanilla, mixing until well combined.
- Fold in the whipped topping: Gently fold in the whipped topping until there are no visible streaks. Take care not to over-mix; it should be light and fluffy, like a cloud! Remember, this is what makes it a no-bake cheesecake.
- Spread the filling: Retrieve your chilled crust and pour the cheesecake mixture into the crust, smoothing the top with a spatula. It’s okay to leave a little decorative swirl if you’re feeling fancy!
- Chill it: Cover the cheesecake with plastic wrap and refrigerate for at least 4 hours, although overnight is best for it to set completely. The wait will be worth it, I promise!
- Add the cherries: Once your cheesecake is set, gently pour the cherry pie filling over the top. Use a spoon to spread it evenly. If you want to get creative, you can arrange the cherries into spooky designs—how fun is that?
- Garnish: Add any extra touches, like candy eyeballs or sprinkles to give it that Halloween flair! It adds a touch of whimsy that kids (and adults!) will adore.
Personal Tip: As you work with the cherry pie filling, it can be helpful to let it sit at room temperature for a few minutes so it’s not too cold when you spread it. This will help keep your cheesecake’s surface nice and smooth!

Pro Tips & Variations
Let’s jazz things up, shall we? Here are some fun twists to consider:
- Fruit variety: Swap the cherry pie filling with your favorite fruit. Blueberries, strawberries, or even tropical fruits like mango could make delightful alternatives.
- Flavor swirls: Add a tablespoon of almond or lemon extract to the cream cheese mixture for an extra flavor kick. Just a little goes a long way!
- Chocolate lovers: Mix in some melted chocolate into the cheesecake filling or sprinkle chocolate shavings on top.
- Diet swaps: Use low-fat cream cheese and sugar substitutes for a healthier version without sacrificing too much flavor.
Just have fun experimenting! This is your dessert canvas, and Halloween is the perfect time to get creative.
Serving Suggestions
This creamy, dreamy cheesecake pairs perfectly with a cozy autumn gathering. I love to serve it chilled with a cup of hot cocoa or apple cider. Imagine the crunch of falling leaves beneath your feet and the laughter of family and friends as you all dig into this sweet delight!
For an extra special treat, consider serving slices with a dollop of fresh whipped cream and a sprinkle of crushed graham crackers on top for added texture and sweetness. You could even accompany it with some ginger snap cookies for a spicy counterpoint. However you choose to serve it, this cheesecake is sure to be the star of your Halloween dessert table!

Storage Tips
This cheesecake is an excellent make-ahead dessert, perfect for parties or when you’re hosting Halloween movie marathons. Here’s how to store it to keep it fresh:
- Refrigeration: Store leftovers in the refrigerator, tightly covered with plastic wrap. It should keep fresh for about 4-5 days.
- Freezing: You can freeze the cheesecake before adding the cherry topping. Wrap it well in plastic wrap and aluminum foil. It can last for up to 2 months! Just thaw in the fridge overnight when you’re ready to enjoy it again.
Remember to add the toppings just before serving for the best texture!
Can I use fresh cherries instead of cherry pie filling?
Absolutely! Just wash, pit, and slice fresh cherries, then toss them with a little sugar and lemon juice to create a delicious topping. It will be fresher and lighter than canned filling!
Is this cheesecake gluten-free?
If you swap the graham cracker crust for gluten-free cookies or a gluten-free graham cracker alternative, you can easily make this cheesecake gluten-free. It tastes just as yummy!
Can I use other types of cheese for the filling?
While cream cheese gives the best flavor and texture, you can experiment with mascarpone for a more delicate taste or even ricotta for a fluffier finish. Just keep in mind that it may alter the overall flavor profile slightly!
How long should I chill the cheesecake?
For the best texture, chill your cheesecake for at least 4 hours, but overnight is even better. The longer it sits, the better the flavors meld together, and trust me, it’s so worth the wait!
Conclusion
And there you have it, my friend! A delectable Halloween No-Bake Cherry Cheesecake that’s as delightful to look at as it is to taste. Whether you’re hosting a spooky gathering or simply indulging in a weeknight treat, this cheesecake is guaranteed to impress. I’d love to hear how yours turns out, so feel free to comment below or tag me in your pictures—I can’t wait to see your spooky creations! Happy Halloween baking!

Leave a Comment