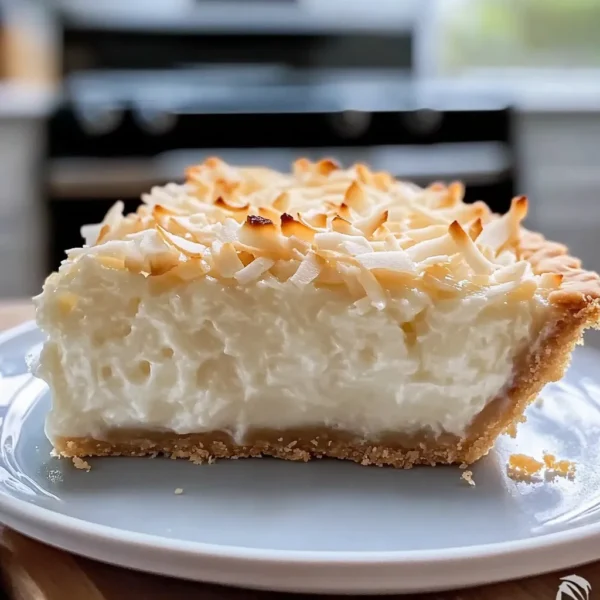
Oh, it’s that time of year again! You know, when the air gets a bit crisper and the leaves paint themselves in hues of orange and gold. It reminds me of afternoons spent in my grandma’s cozy kitchen, where the scent of something sweet wafted through the air like a warm hug. One of her all-time favorites? Her Old Fashioned Coconut Pie! It was so much more than just a dessert; it was a celebration of love, family, and the sheer joy of baking. That glorious blend of creamy coconut filling nestled in a buttery crust is something I’ve cherished my whole life.
This Old Fashioned Coconut Pie recipe captures all those memories and flavors in one slice. Whether you’re sharing it at a family gathering or savoring it solo, every bite is an ode to nostalgia. So grab your mixing bowl, and let’s create something magical together!
Why You’ll Love This Recipe
- Easy to make: Perfect for bakers of all skill levels!
- Comforting flavors: It’s like a warm embrace on a plate.
- Make ahead: Ideal for busy weeknights or special occasions.
- Budget-friendly: Utilizes simple ingredients you might already have at home.
Ingredients
Let’s gather our ingredients! Here’s what you’ll need for this delightful pie:
- 1 ½ cups graham cracker crumbs (or use your favorite pastry crust)
- ½ cup unsweetened shredded coconut
- ⅓ cup sugar
- ½ cup butter, melted (using unsalted for control of flavor)
- 1 (14 oz.) can sweetened condensed milk
- 2 large eggs
- 1 teaspoon vanilla extract
- 1 ½ cups sweetened shredded coconut (for the filling)
- Optional: whipped cream for topping!
Step-by-Step Instructions
Ready to create some pie magic? Let’s dive in with these easy steps:
- Preheat your oven: Set it to 350°F (175°C). A warm oven means a perfect baking experience!
- Prepare the crust: In a medium mixing bowl, combine the graham cracker crumbs, ½ cup shredded coconut, sugar, and melted butter. Mix until all the crumbs are moistened.
- Form the crust: Press this mixture firmly into the bottom and up the sides of a 9-inch pie dish. Make sure to compact it well; you want a stable foundation for all that coconut goodness.
- Bake the crust: Pop it in the oven for about 8-10 minutes until it’s golden and fragrant. This step is key, as it adds a toasty flavor!
- Prepare the filling: In a separate bowl, whisk together the sweetened condensed milk, eggs, and vanilla extract until smooth and creamy.
- Add the coconut: Stir in the 1 ½ cups of shredded coconut until evenly distributed throughout the mixture. You’ll want to think of each coconut flake as a little treasure for your taste buds!
- Pour filling into the crust: Once the crust is done and cooled slightly, carefully pour the coconut filling into your crust. Use a spatula to evenly spread it out.
- Bake the pie: Return the pie to the oven and bake for another 25-30 minutes or until the filling is set and has a light golden tint. The smell at this point will have you dreaming of tropical beaches!
- Cool down: Allow the pie to cool at room temperature for about 30 minutes before chilling in the refrigerator for at least two hours. This will give you that perfect slice of creaminess!
- Serve: Top with whipped cream if desired and enjoy a slice of nostalgia!

Pro Tips & Variations
Feeling a little adventurous? Here are some fun twists and tips to customize your Old Fashioned Coconut Pie:
- Nutty addition: Add a handful of chopped pecans or walnuts to the crust for extra crunch!
- Coconut cream: For an even creamier filling, swap out half of the sweetened condensed milk with coconut cream.
- Spice it up: A pinch of nutmeg or cinnamon can add a delightful aromatic twist to the filling.
- Chocolate lover: Drizzle some melted dark chocolate over the top before adding whipped cream for a delightful combo!
Serving Suggestions
This pie is a showstopper on its own, but if you’re looking to elevate your dessert game a notch, here are my favorite serving ideas:
- With whipped cream: A cloud of whipped cream on top takes this pie from delicious to divine!
- Pair with coffee: A nice cup of freshly brewed coffee complements the pie’s sweetness perfectly. It’s like comfort in a cup!
- Fruit garnish: Add some fresh fruit like kiwi, strawberries, or mango on the side for a colorful plate.
- Next-level indulgence: A scoop of vanilla ice cream on the side transforms a slice into an unforgettable treat!
Storage Tips
You might be wondering how to keep this delicious pie fresh for days. Here’s how:
- Refrigeration: Store any leftovers in the fridge, covered with plastic wrap or in an airtight container, for up to 4 days. The flavors will meld even more!
- Freezing: You can freeze cut slices wrapped tightly in plastic wrap and then aluminum foil for up to 3 months. Just let it thaw in the fridge overnight when you’re ready to enjoy it again.
- Reheating: If you’d like to enjoy it warm, pop a slice in the microwave for about 10-15 seconds. Just be careful not to overheat it, or it will lose that lovely creamy texture!
FAQs
Can I use fresh coconut in this recipe?
Absolutely! Fresh coconut can lend even more flavor and texture to your pie. Just make sure to finely shred it before use.
What if I don’t have sweetened shredded coconut?
No worries! You can use unsweetened coconut and add a little sugar to the filling to taste. Adjust according to your sweetness preference!
Can I make this pie dairy-free?
Yes, you can substitute the sweetened condensed milk with coconut or almond cream and use dairy-free butter in the crust. It will still be scrumptious!
How do I know when the pie is done baking?
Look for a lightly golden top and a filling that’s set but still slightly jiggly in the center. It will firm up as it cools!
Conclusion
There you have it, my friends! A slice of Old Fashioned Coconut Pie that brings back those warm memories and fills your kitchen with that delightful aroma. I hope you cherish every bite just as much as I do. Feel free to comment below, share how your pie turned out, or let me know any variations you try! Happy baking!

Leave a Comment