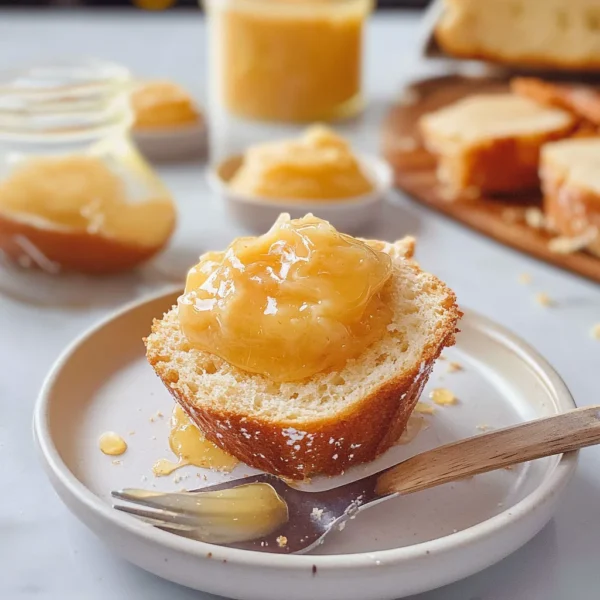
There’s something magical about the first warm breeze of spring that makes me crave all things sweet and creamy. I remember countless mornings spent at my grandmother’s table, the comforting aroma of fresh-baked bread greeting me as I leaned in for a good-morning hug. She always had a little jar of whipped honey butter waiting for us, perched next to homemade preserves. Now, whenever I whip up a batch of this Whipped Honey Butter, I can’t help but feel that same love and nostalgia wash over me. It’s deliciously sweet, velvety, and perfect for spreading over warm biscuits or scones!
This Whipped Honey Butter Recipe is so simple, yet it brings a burst of joy that can elevate even the humblest of breakfasts. Trust me; once you try it, you’ll want to keep a batch on hand at all times.
Why You’ll Love This Recipe
- Quick and easy to make—perfect for any skill level!
- Only a few simple ingredients that you probably already have.
- Rich, creamy texture with a delightful hint of sweetness.
- Versatile—great on bread, pancakes, or even as a gift in a cute jar!
Ingredients
- 1 cup unsalted butter (softened, at room temperature)
- 1/2 cup honey (preferably raw for richer flavor)
- 1/4 teaspoon salt (to enhance the sweetness)
- 1 teaspoon vanilla extract (adds warmth and depth)
Note: The best butter brings the best flavor. Try to use high-quality, fresh butter for a creamier taste. And if you’re feeling adventurous, seek out unique honey varieties—like clover, wildflower, or even lavender honey for a twist!

Step-by-Step Instructions
- Soften Your Butter: Make sure your unsalted butter is really soft, almost spreadable. You can pull it out of the fridge an hour before you start, or pop it in the microwave for about 10 seconds just to take the chill off. You want it super creamy!
- Mix It Up: In a medium mixing bowl, add your softened butter, honey, salt, and vanilla extract. Using a hand mixer or a sturdy whisk, whip everything together until it’s light and fluffy. This usually takes about 2-3 minutes. You want it nice and airy!
- Scrape & Mix Again: Don’t forget to scrape down the sides of the bowl with a spatula and give it another quick mix. This ensures all those delicious flavors are perfectly blended.
- Taste It! Here’s where you can adjust to your liking. If you want it sweeter, add a touch more honey. If you prefer a hint of saltiness, add a pinch more salt.
- Store It: Once you’re happy with the taste and texture, transfer the whipped honey butter into an airtight container or a cute jar for serving. You could even tie a little ribbon around the jar for a lovely gift!
Pro Tip: Make sure your butter is truly soft enough; hard butter will give you lumps instead of that airy fluffiness we’re after. Also, if you like a hint of spice—try adding a sprinkle of cinnamon or a dash of nutmeg for an autumnal twist!
Pro Tips & Variations
- Flavor Boost: Feel free to experiment with different extracts like almond or maple for a fun twist.
- Herb Infusion: Want a savory angle? Mix in finely chopped fresh herbs like basil or rosemary—perfect for a summer brunch!
- Cocoa Delight: You can also add a couple of tablespoons of unsweetened cocoa powder for a chocolate version. It’s heavenly on bagels!
Don’t be afraid to get creative! The beauty of this recipe is its flexibility. Just have fun with it!
Serving Suggestions
Your fluffy whipped honey butter is not just for toast—although it is fantastic on warm baguettes or a flaky croissant! Here are some cozy serving ideas:
- Spread it generously over freshly baked cinnamon rolls.
- Top pancakes or waffles with a dollop for a delightful breakfast twist.
- Pair it with a cheese board; it works wonders with sharp cheeses.
- Mix it into oatmeal for a sweet, creamy touch.
Imagine a chilly morning, fluffy pancakes stack high plopped on a plate, dripping with maple syrup, and crowned with a swirl of this luscious honey butter. Oh, pure bliss!

Storage Tips
Once you’ve made your whipped honey butter, you’ll want to keep it fresh and tasty! Here’s how:
- Refrigerate: Store in an airtight container in the fridge for up to 2 weeks. Just make sure to let it soften before slathering!
- Freeze: You can freeze for up to 3 months. Just scoop it into ice cube trays or small jars, cover tightly, and it will be ready to thaw whenever you need a sweet treat.
- Reheat: Thaw it overnight in the fridge for best results, or let it sit at room temperature for 30 minutes before using. Quick warming in the microwave isn’t advisable unless it’s just a few seconds to soften.
FAQs
Can I use salted butter instead of unsalted?
Yes, you can, but keep in mind that the overall saltiness will be more pronounced. If you do use salted butter, you might want to omit the added salt in the recipe.
Can I use a blender instead of a hand mixer?
Absolutely! Just make sure to periodically scrape down the sides of the blender to ensure everything gets mixed evenly. Just be cautious not to over-blend, as you want that whipped texture!
What can I serve this with, besides bread?
The possibilities are endless! Pile it on pancakes, waffles, or muffins, mix into mashed sweet potatoes or butternut squash, or spread on fresh fruit like apples or pears—delicious!
How can I make it dairy-free?
Easy! Simply swap the butter for a non-dairy alternative like coconut oil or a dairy-free margarine. Just make sure it’s soft enough to whip! You may adjust the honey amount as needed for sweetness.
Conclusion
Now you’ve got the magic of Whipped Honey Butter at your fingertips! The joy it brings is unparalleled, and I can’t wait for you to experience it yourself. Don’t forget to come back and comment with your thoughts or creative variations! I love hearing how you make each recipe your own. So, grab your ingredients, enjoy the process, and spread the love with this delightful treat!


Leave a Comment